Monday, May 16, 2016

First Holy Eucharist

 Look at those beautiful faces!  They're full of wonder, excitement, nerves, anticipation!  They have been waiting all year for this special day.  It doesn't matter if they're my students or not.  Every time I see a child in their Holy Communion dress clothes, I can't help but smile.  Today was no exception!


Wednesday, May 11, 2016

Our Star Tags

     The kiddos are coming home with their "Star Tags" this week!  Everyone LOVES getting rewarded with them.  


     All of our tags have to be earned, except for our weekly lesson tags.  These are very specific to our class, our textbook and the lessons taught.  


     We have a big rule in our class- You can NOT ask for a Star Tag!  My rule is that a student may not ask for a star tag nor can they point out a behavior that another student (a.k.a. friend) is doing in an effort to get a star tag.  I tell my students that the teacher must notice this and decide if it is "star tag worthy".


Tuesday, May 10, 2016

Preparation

     My second graders have been preparing all year to receive their First Holy Eucharist.  The day before, we have a student and parent meeting.  We practice how we walk down the aisle and line up at our pews.  We talk more about what the day means.  Then we split the parents and the students. 

    
     The kids write a special prayer to Jesus.  We've already talked about the types of prayers, so they know that this is like talking to a friend or writing a letter to a loved one.  The parents write a letter to their child, talking about why this day is special and how they're proud of their child.  There are always some kids who really take their time to write the prayer and want it just right.  They completely understand and truly believe that Jesus is with them. 


     The kids write about how thankful they are for this special day.  They thank Jesus for taking away their sins and for dying on the cross for them.  All of this innocence and complete belief always rocks me to my core.  I have a strong faith but sometimes I question myself and if I'm making the right choices and am teaching the best that I can.  But when I watch the kids, at this moment, I know that everything is perfect.  To be able to witness this faith in young children is always heart warming!


Wednesday, May 4, 2016

First Holy Communion Banners


     This past weekend was my class's First Holy Communion!  I love this day every year.  It's so special and the kids are always excited to receive Jesus.  I usually get tears in my eyes when I see the beautiful white dresses and the boys looking so handsome.  I always have a few that are nervous!  

     Each child is asked to make a banner.  I stress that it is a banner for the child and that the child should help in making it.  I know many parents get excited about this day and want it to be perfect, including what the banner looks like.  I was that parent many years ago, during Andrew's First Holy Communion.  Then I realized, the banner is perfect when it reflects the love that our children have for Jesus and their special Holy Sacrament.  


     In the four years that I've been teaching 2nd grade and Holy Communion, I've never seen a duplicate banner.  This year is no exception!  And of course they turned out beautiful.


Kindness Matters

This week in my second grade Religious Education class, we talked about kindness and how God and Jesus have ALWAYS shown us kindness.  The kids told me ways that they have shown kindness to others.  They each needed to write at least 5 kind deeds on the paper links.  None of them had a hard time filling out the five and many filled out six or seven.                                                                                                                                                    
I asked them if five kind deeds seemed like a lot.  Most answered no.  Then we attached all of the links together.  I asked, does this seem like a lot of kind deeds.  They all answered yes this time.  I explained that the number of kind deeds didn't really change.  That their five deeds added to the rest but it started with just ONE kind deed.  This helped show the kids that even by doing one kind deed, that they are making a difference.  We also talked about how kind deeds can be contagious!  So just by smiling, our simple kind deed can make a BIG difference in the life of someone we just pass by.


     After talking about kindness and linking our deeds together, we hung them up in our classroom.  I asked them who has shown them kindness.
Of course they listed parents, teachers, friends, family, etc.  Then I asked if anyone gave up their life for them.  Jesus!  I asked if anyone took away their sins.  JESUS!  To see the connections of their small kind deeds to Jesus' HUGE kind deed was amazing.  We talked about how Jesus performed miracles as his kind deeds but that his disciples are asked to do any kind deed- they don't have to be as big as Jesus'.


     After reading out of our book and some Bible verses, we decided to do some RANDOM acts of kindness.  We talked about how Jesus didn't go about bragging about all of the miracles that he performed.  He actually taught to keep your good deeds to yourself.  Only God needs to know the good that you do, after all HE'S the only one that really matters.  So, we decided to work on some simple random acts.  The kids cut out these beautiful cards made by Kids Activities Blog and they're FREE!  I printed them on card stock.
     
     We had a couple of rules.  You could only use 2 cards at home or for your family members and you couldn't brag about your kind deed!  I wanted the kids to remember that kindness is contagious, so we should try to pass it along and get it to go as far as possible.


Calvary Sunset

I made a beautiful craft with my second grade Religious Education class the other week.  First I wanted to try it out at home and make sure we could complete it in a reasonable amount of time.  You never with second grade, sometimes the easiest projects seem to take FOREVER.  Lily and Thomas are my models and did a great job.  After wards, Chloe joined them and they had fun making tye dye designs.


     I would love to tell you where I saw this craft but apparently I didn't save the link.  If you know it or come across it, please comment below.  I'd love to give credit where it's due.


     Anyway, this is a pretty easy project.  Depending on the age of the kids, you may have to do some prep work first.  Since I have second grade and we have a limited amount of time during our RE class, I drew the crosses on all of the black plates.  First I drew the scene on one plate, cut it out and then used that as the template.  I used the template and traced the scene on all of the plates for the class.


     I poked a pencil hole in the top of each scene.  This would let the kids be able to put their scissors in to the hole and start cutting out the scene.  That way the frame of the plate would not get cut. While the 1/2 of the class was cutting, the other 1/2 was making the sunset scene.


     I laid out a plastic table cloth and the kids worked on this.  The kids used my scented markers and drew on the coffee filters.  Be sure that they don't color too much in one area- it will put a hole in the filter.  We tried using washable markers and regular crayola markers.  The washables didn't work at all.  The other markers worked but didn't blend as well as my Mr. Sketch scented markers.  Plus these are the  most fun to use!


     Once the filters are colored, simply use a water bottle and spray a few times.  The kids thought it was cool how the colors blended together.  Don't use too much water.  Definitely do this part on the table cloth- the markers will bleed through the filter and onto the counter/table.


     Once the filters are dry (happens pretty quickly) just use some glue sticks and adhere them to the back of the paper plates.  And you're done.  Super easy and absolutely beautiful.


Marble Art

Today my little guy, my nephew and I made a cute art project.  It was super easy, a little messy and the boys had a blast.  All you need are a few supplies and they're probably ones that you have on hand already.
1.  Shaving Cream
2.  Food Coloring
3.  Toothpicks
4.  Paper (we used cardstock)
5.  Some sort of scraper 

      Go ahead and put the shaving cream on a thin pan or baking sheet.  Then let your kiddos smear it all around!  This is the part that the boys really liked.  At first my nephew was hesitant but then he dove right in.  Make sure the shaving cream covers all of the pan, so you might have to go back over it when the kids are done.  I then let the boys color on the table with the shaving cream!


     Now here's where it got a little messy!  In hindsight, I would have the boys wear gloves or have the adult do this next part.  The boys did wear paint shirts to be safe!  You'll take the food coloring and place drops of it all over the paper.  We talked about the colors as they were dropping the colors.  Then use a toothpick and swirl the food coloring all around the shaving cream.  You can even talk about what happens when colors get combined- secondary colors!


      After the shaving cream gets swirled, simply place the paper on top of the shaving cream and gently press the paper down.  Once you lift the paper up just use the scraper and wipe the shaving cream off.  It leaves a beautiful marble effect on the paper.  I would definitely put down a plastic table cloth for this part!  The table gets pretty messy but Mr. Clean helps to take care of it!


     The paper will need to dry for awhile, but then you can do anything with it.  We plan on cutting ours out into hearts and coloring them for Valentine's Day!  I would also keep a close eye on them and make sure they don't try to sneak a taste of the shaving cream when you're not looking.  According to my nephew, it doesn't taste very good! ;)

Letter Bb Craft


     You can print out the letter B craft, for FREE, at my teachers pay teachers store- 
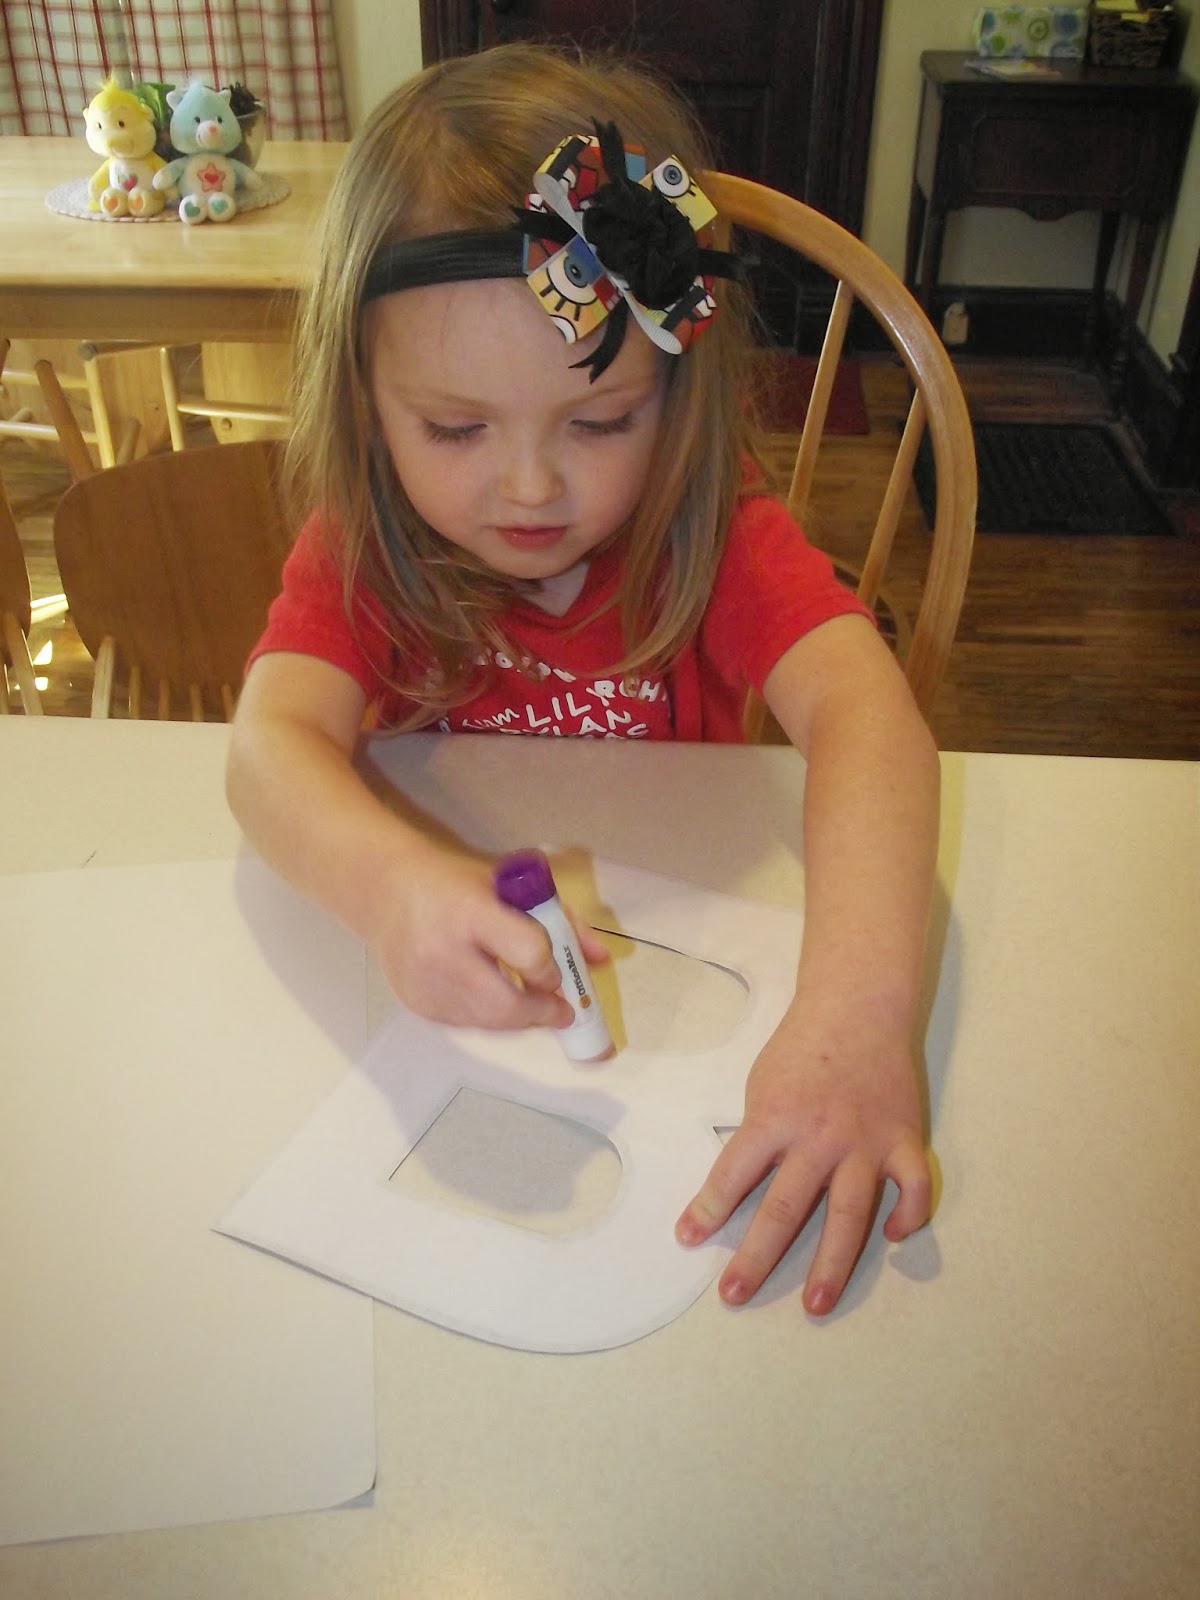
here.  I cut out the giant letter B and Lily glued it onto construction paper.  She can be very stubborn at times, and only wanted white paper.  So, the pics aren't very colorful, but she's the student after all!


     I explained to Lily that we were turning the letter B into a bear and that the bear was hungry.  Hungry for what?  Letter B and b!  The bottom loop of the letter B is the bear's tummy.  So, she cut out the letters and glued them onto the bear's tummy.


     I cut out strips of brown paper and Lily cut them into little squares. Can you believe our package of construction paper didn't have brown?  So, I ended up using brown wrapping paper.  You could even use lunch or grocery bags.  Lily then glued the squares onto the letter B, to make the brown bear.  This would be a great time to talk about B words- bee, brown, bear, etc.  You could also read one of our favorite books- Brown Bear, Brown Bear by Eric Carle.


     I cut out the head and paws for Lily, since they're a little tricky.  But Lily being stubborn, didn't like that there was a black outline on the bear's head.  So, she just had to hack it trim it a little.


Here's what Thomas's mommy school looked like today!
(BTW- is it Thomas's or Thomas') 


     Lily, again being stubborn, didn't want to color the head or paws!  You can glue the head of the bear onto the middle of the top loop.  She added the two biggest paws to the bottom of the bottom loop.  When I first made this, Lily was upset that I didn't make any hand paws!  So, the version in my store has feet and hand paws.


Sightword Password

Something that I created to help Lily with her sight words, is the Sight Word Password game!  I printed our sight words onto hand prints.  I cut out the handprints and have them all around our house.  In order for Lily to go into a new room or do something, she has to complete the sightword password! 

 There are currently 3 hands on the toy room door, 3 hands next to the bathroom light, 3 hands on the outside door, 3 hands at Lily's bedroom, and 3 hands to go upstairs.

     Lily gives the hands a high five as she reads the sight words.  We just finished up the words- a, and, the- so those words are at the doors.  Next week, I'll take out "and" (she has that one totally mastered) and add a new word to the list.  I'll probably put the "and" hand in different places so Lily can still practice it.  She loves this and yells at the big kids if they forget to do the password!  They keep telling her that they already know how to read and she tells them "You're not following the rules.  Passwords are important!"


Name Art

First, I wrote their names on paper with liquid glue.  Lily & Thomas thought that was cool and we hadn't even started!  Then I let them put salt on top of the wet glue.  They LOVED this.  Be sure to have your paper inside a pan.  This keeps the salt spillage to a minimum.


Once the letters are covered in salt, shake the excess salt off of the paper.  I mixed food coloring with a little bit of water in our ice containers.  The kids used paint brushes to put the color onto the salt letters.  We talked about how salt absorbs water.  I reminded Lily how we'd put salt on the ice during the winter.  She remembered why and we talked about absorption!

I had to show them how NOT to rub the paint brushes on the salt.  To let the salt absorb the colored water.  They both though it was really cool.  Lily loved how the colors would bleed together.